W3 Total Cache is a powerful WordPress plugin designed to improve your website’s performance by caching your pages and posts, compressing files to reduce loading times, and providing integration options for Content Delivery Networks (CDNs). By optimizing your WordPress site with W3 Total Cache, you can significantly decrease your site’s load time, improve user experience, and potentially boost your SEO rankings.
Benefits of Using W3 Total Cache
- Improved Page Load Times: By caching pages, posts, and other site elements, W3 Total Cache reduces the time it takes for your site to load.
- Enhanced User Experience: Faster load times mean a smoother experience for your visitors, potentially reducing bounce rates.
- SEO Advantages: Speed is a ranking factor for search engines like Google. A faster site can lead to better search rankings.
How W3 Total Cache Improves Your Website
W3 Total Cache implements various performance optimizations including page cache, object cache, database cache, and browser cache. It can also minify and compress HTML, CSS, and JavaScript files, further speeding up your site.
Preparing Your Website
Before installing any plugin, it’s crucial to prepare your site to avoid any potential issues.
Backup Your WordPress Site
Always back up your WordPress site, including your database and files. This ensures you can restore your site if anything goes wrong during the installation or configuration process.
Check Compatibility
Ensure your hosting environment meets the minimum requirements for W3 Total Cache and check for any known conflicts with other plugins or themes you are using.
Installation of W3 Total Cache
Step-by-Step Installation Guide
- Log in to your WordPress dashboard.
- Go to Plugins > Add New and search for W3 Total Cache.
- Install and then Activate the plugin.
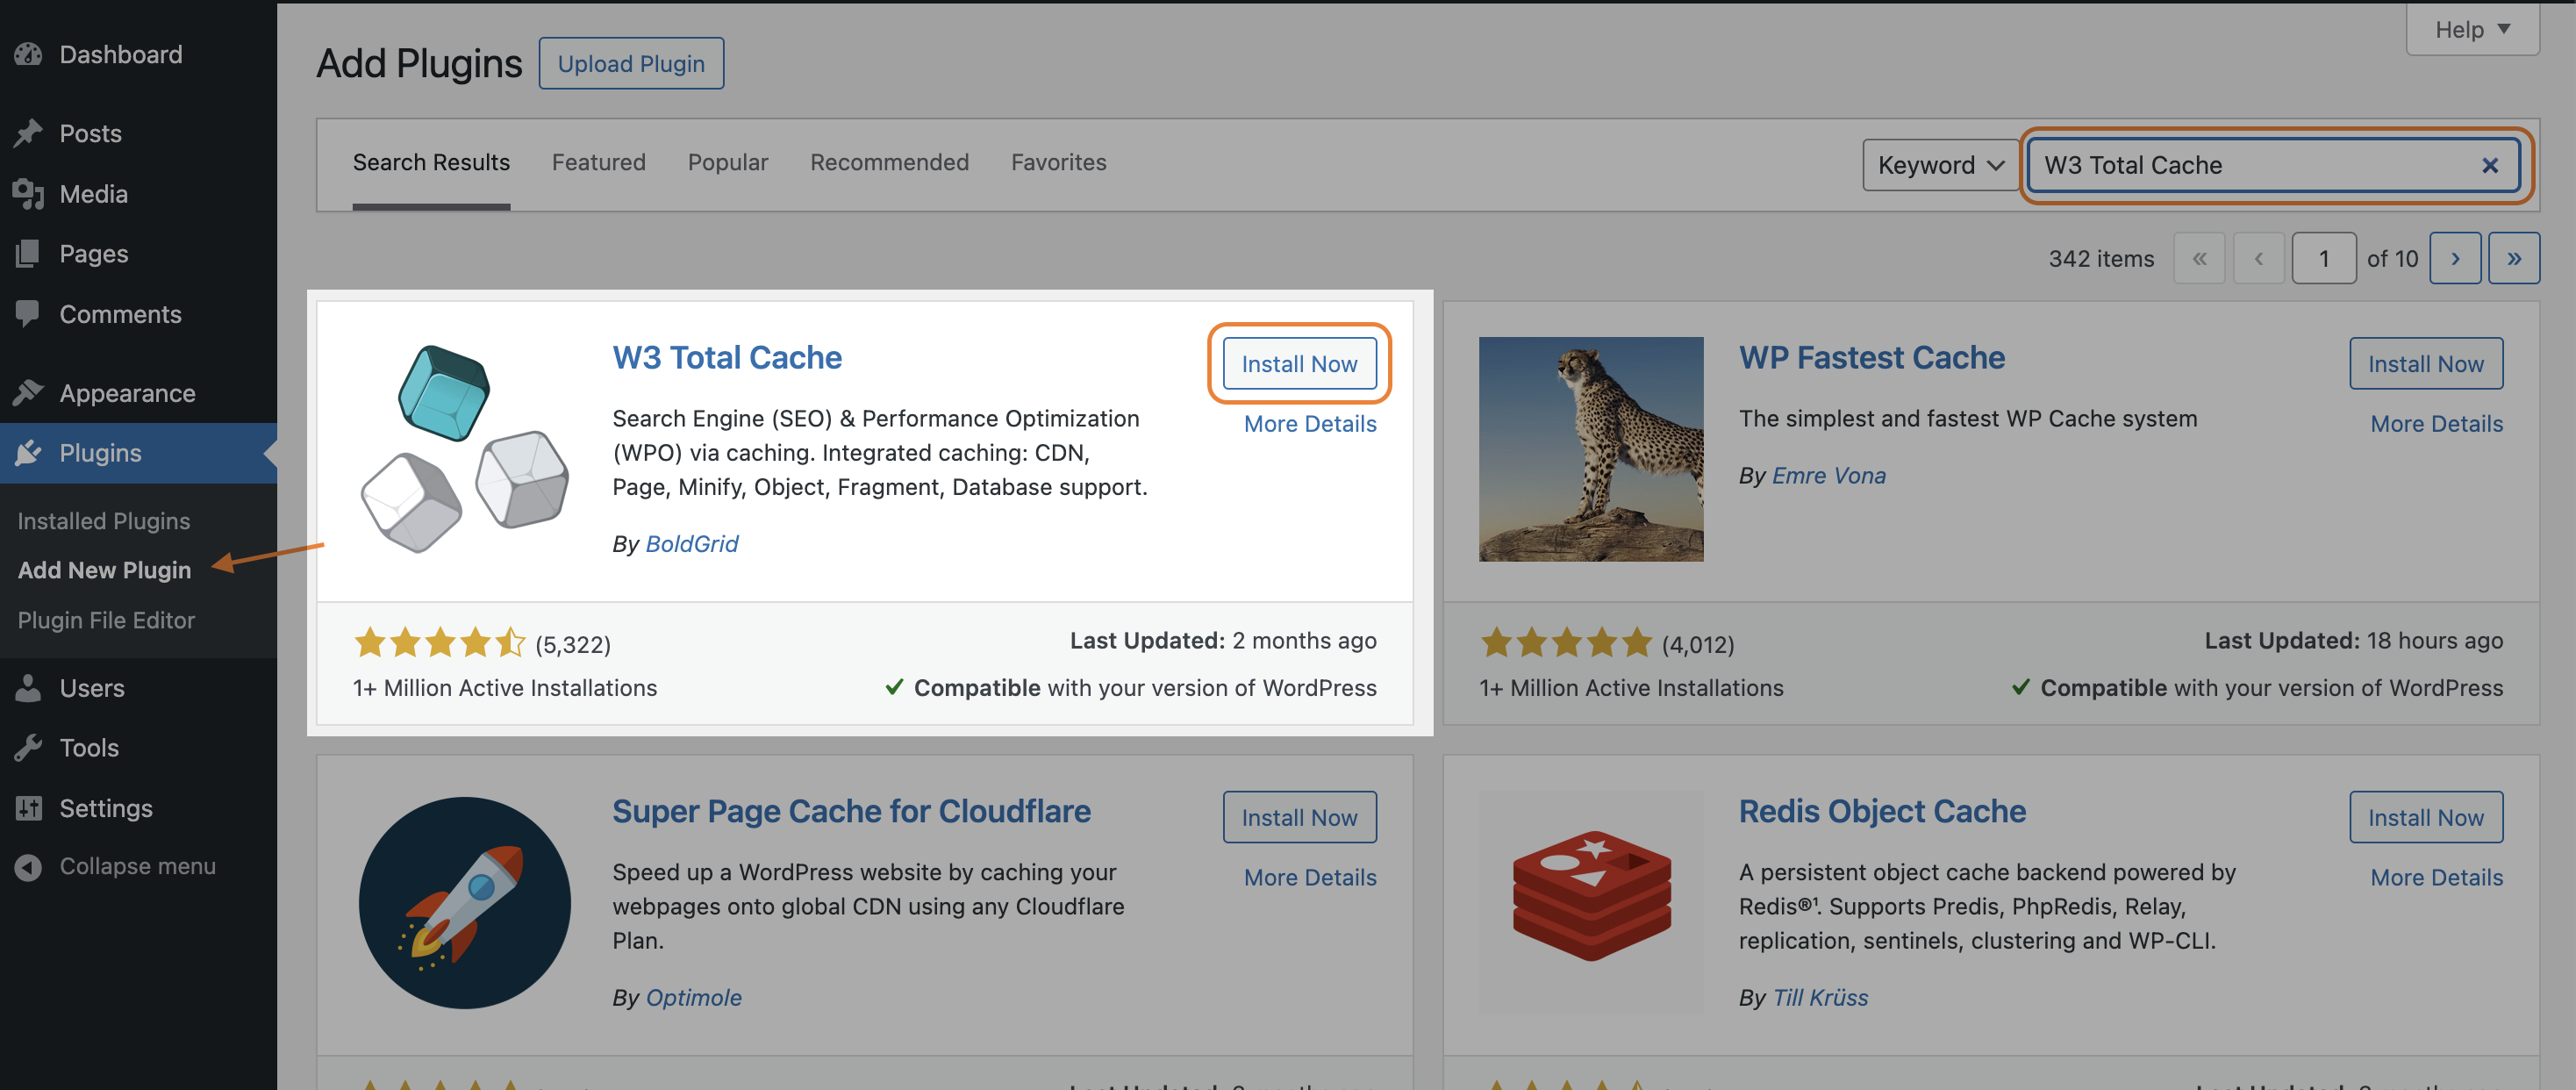
Activating the Plugin
Once activated, W3 Total Cache adds a menu item to your WordPress dashboard, allowing you to access its settings and configuration options.
Basic Configuration of W3 Total Cache
After activating the plugin you will be redirected to the plugin setup page where you can see the the skip and the next button. Click on the next button.
PS: If the next button is not visible to you just scroll is little bit.

Page Cache
The page cache is the time taken between a visitor’s browser page request and receiving the first byte of a response is referred to as Time to First Byte.
Click on the Test Page Cache button.
Once you click on the Test page cache button W3 Total Cache test your homepage with Page Cache disabled and then with several storage engines. It provided the test result and the most suitable option for your site.

Database Cache
Many database queries are made in every dynamic page request. A database cache may speed up the generation of dynamic pages. Database Cache serves query results directly from a storage engine.
Click on the Test Database Cache button.
Once you click on the Test database cache button W3 Total Cache provides the test result and the most suitable option for your site.

By default, this feature is disabled. We recommend using Redis or Memcached, otherwise leave this feature disabled as the server database engine may be faster than using disk caching.
Object Cache
WordPress caches objects used to build pages, but does not reuse them for future page requests.
W3 Total Cache can help you speed up dynamic pages by persistently storing objects.
Click on the Test object cache button W3 Total Cache provides the test result and the most suitable option for your site.

Browser Cache
Browser caching can speed up your WordPress site considerably by storing static assets like CSS, JavaScript, images, and fonts locally. Browser caching uses an expiration period to determine how long to cache assets for. On the modern web, most developers specify an expiration period of 1 year for static assets.
W3 Total Cache can help ensure browsers are properly caching your assets.
The Cache-Control header tells your browser how it should cache specific files. The max-age setting tells your browser how long, in seconds, it should use its cached version of a file before requesting an updated one.
To improve Browser Cache, we recommend enabling Browser Cache.
Click on the Test Browser cache button W3 Total Cache provides the test result and the most suitable option for your site.

Image Optimization
This option enabled Adds the ability to convert images in the Media Library to the modern WebP format for better performance.

Lazy Load
Lazy loading is a technique in web development where certain elements, like images or videos, are loaded only when they become visible to the user, typically as they scroll down a webpage. This helps speed up initial page loading times and improves overall performance by deferring the loading of non-essential content until it’s needed.
W3 Total Cache provide an option to add ability lazy loaded images.

After clicking the next button, you’ll receive a summary of all the options you have selected so far. You can review this summary, and if you want to change any of these options, you can navigate to the particular page by pressing the previous button. Alternatively, you can also modify any of these settings from the W3 Total Cache plugin menu.

Click on the Dashboard button.
General Settings Overview
By default, every single request to your WordPress site is rendered in real-time. For certain kinds of sites like eCommerce stores or discussion forums, dynamic rendering is ideal. However, for blogs, news sites, and other sites that don’t require dynamic content, adding a page caching layer can improve performance and reduce server load.
Start with the General Settings to enable or disable various caching features. It’s recommended to enable Page Cache, Minify, and Browser Cache for most sites.
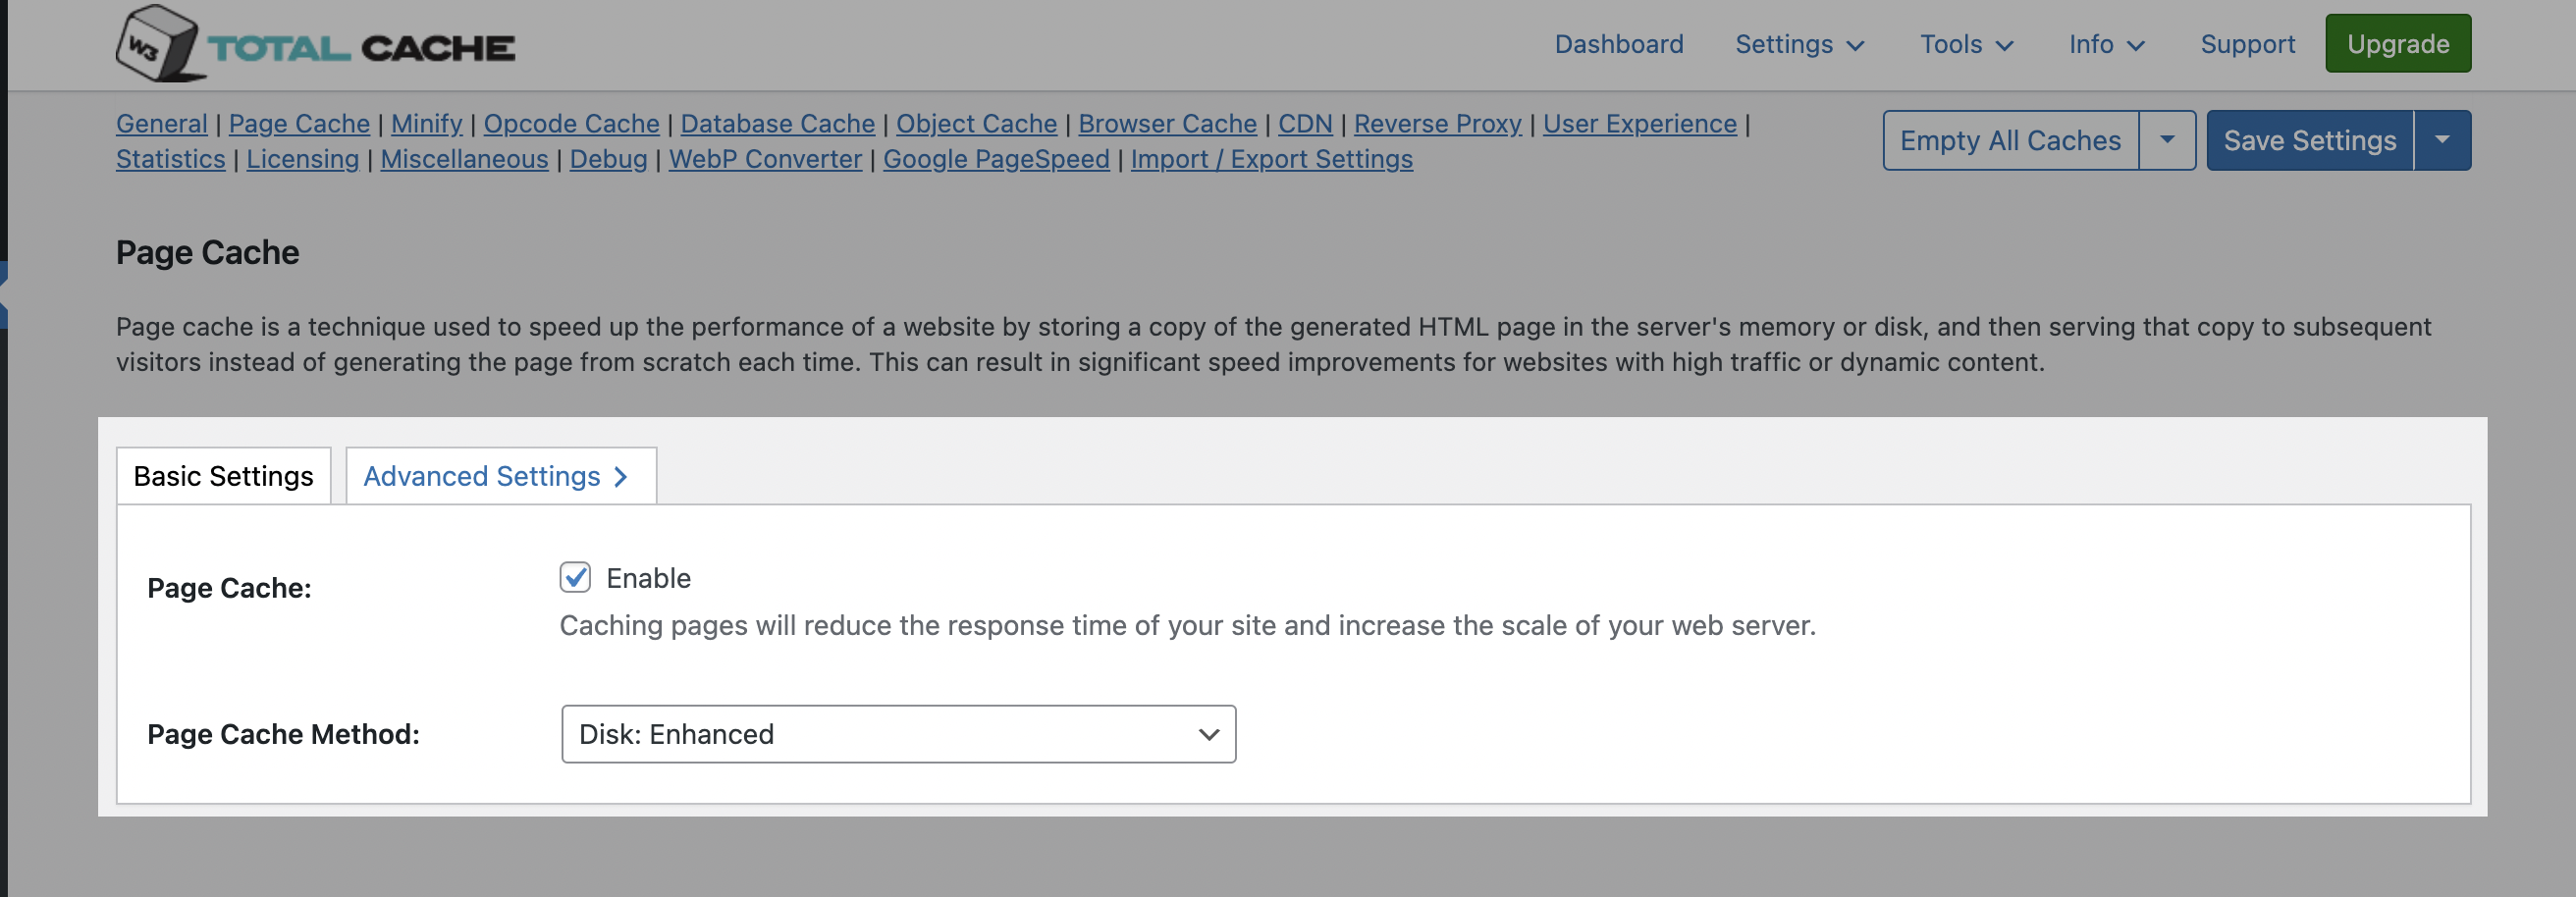
Page Cache Configuration
- Enable Page Cache: This option is already enabled we have done in previous steps. If not then enable it. This reduces the response time of your site by caching static versions of your content.
- Cache Method: Select the appropriate method based on your hosting environment (e.g., Disk: Enhanced for shared hosting). – We have select Disk: Which is recommended by W3 Total Cache
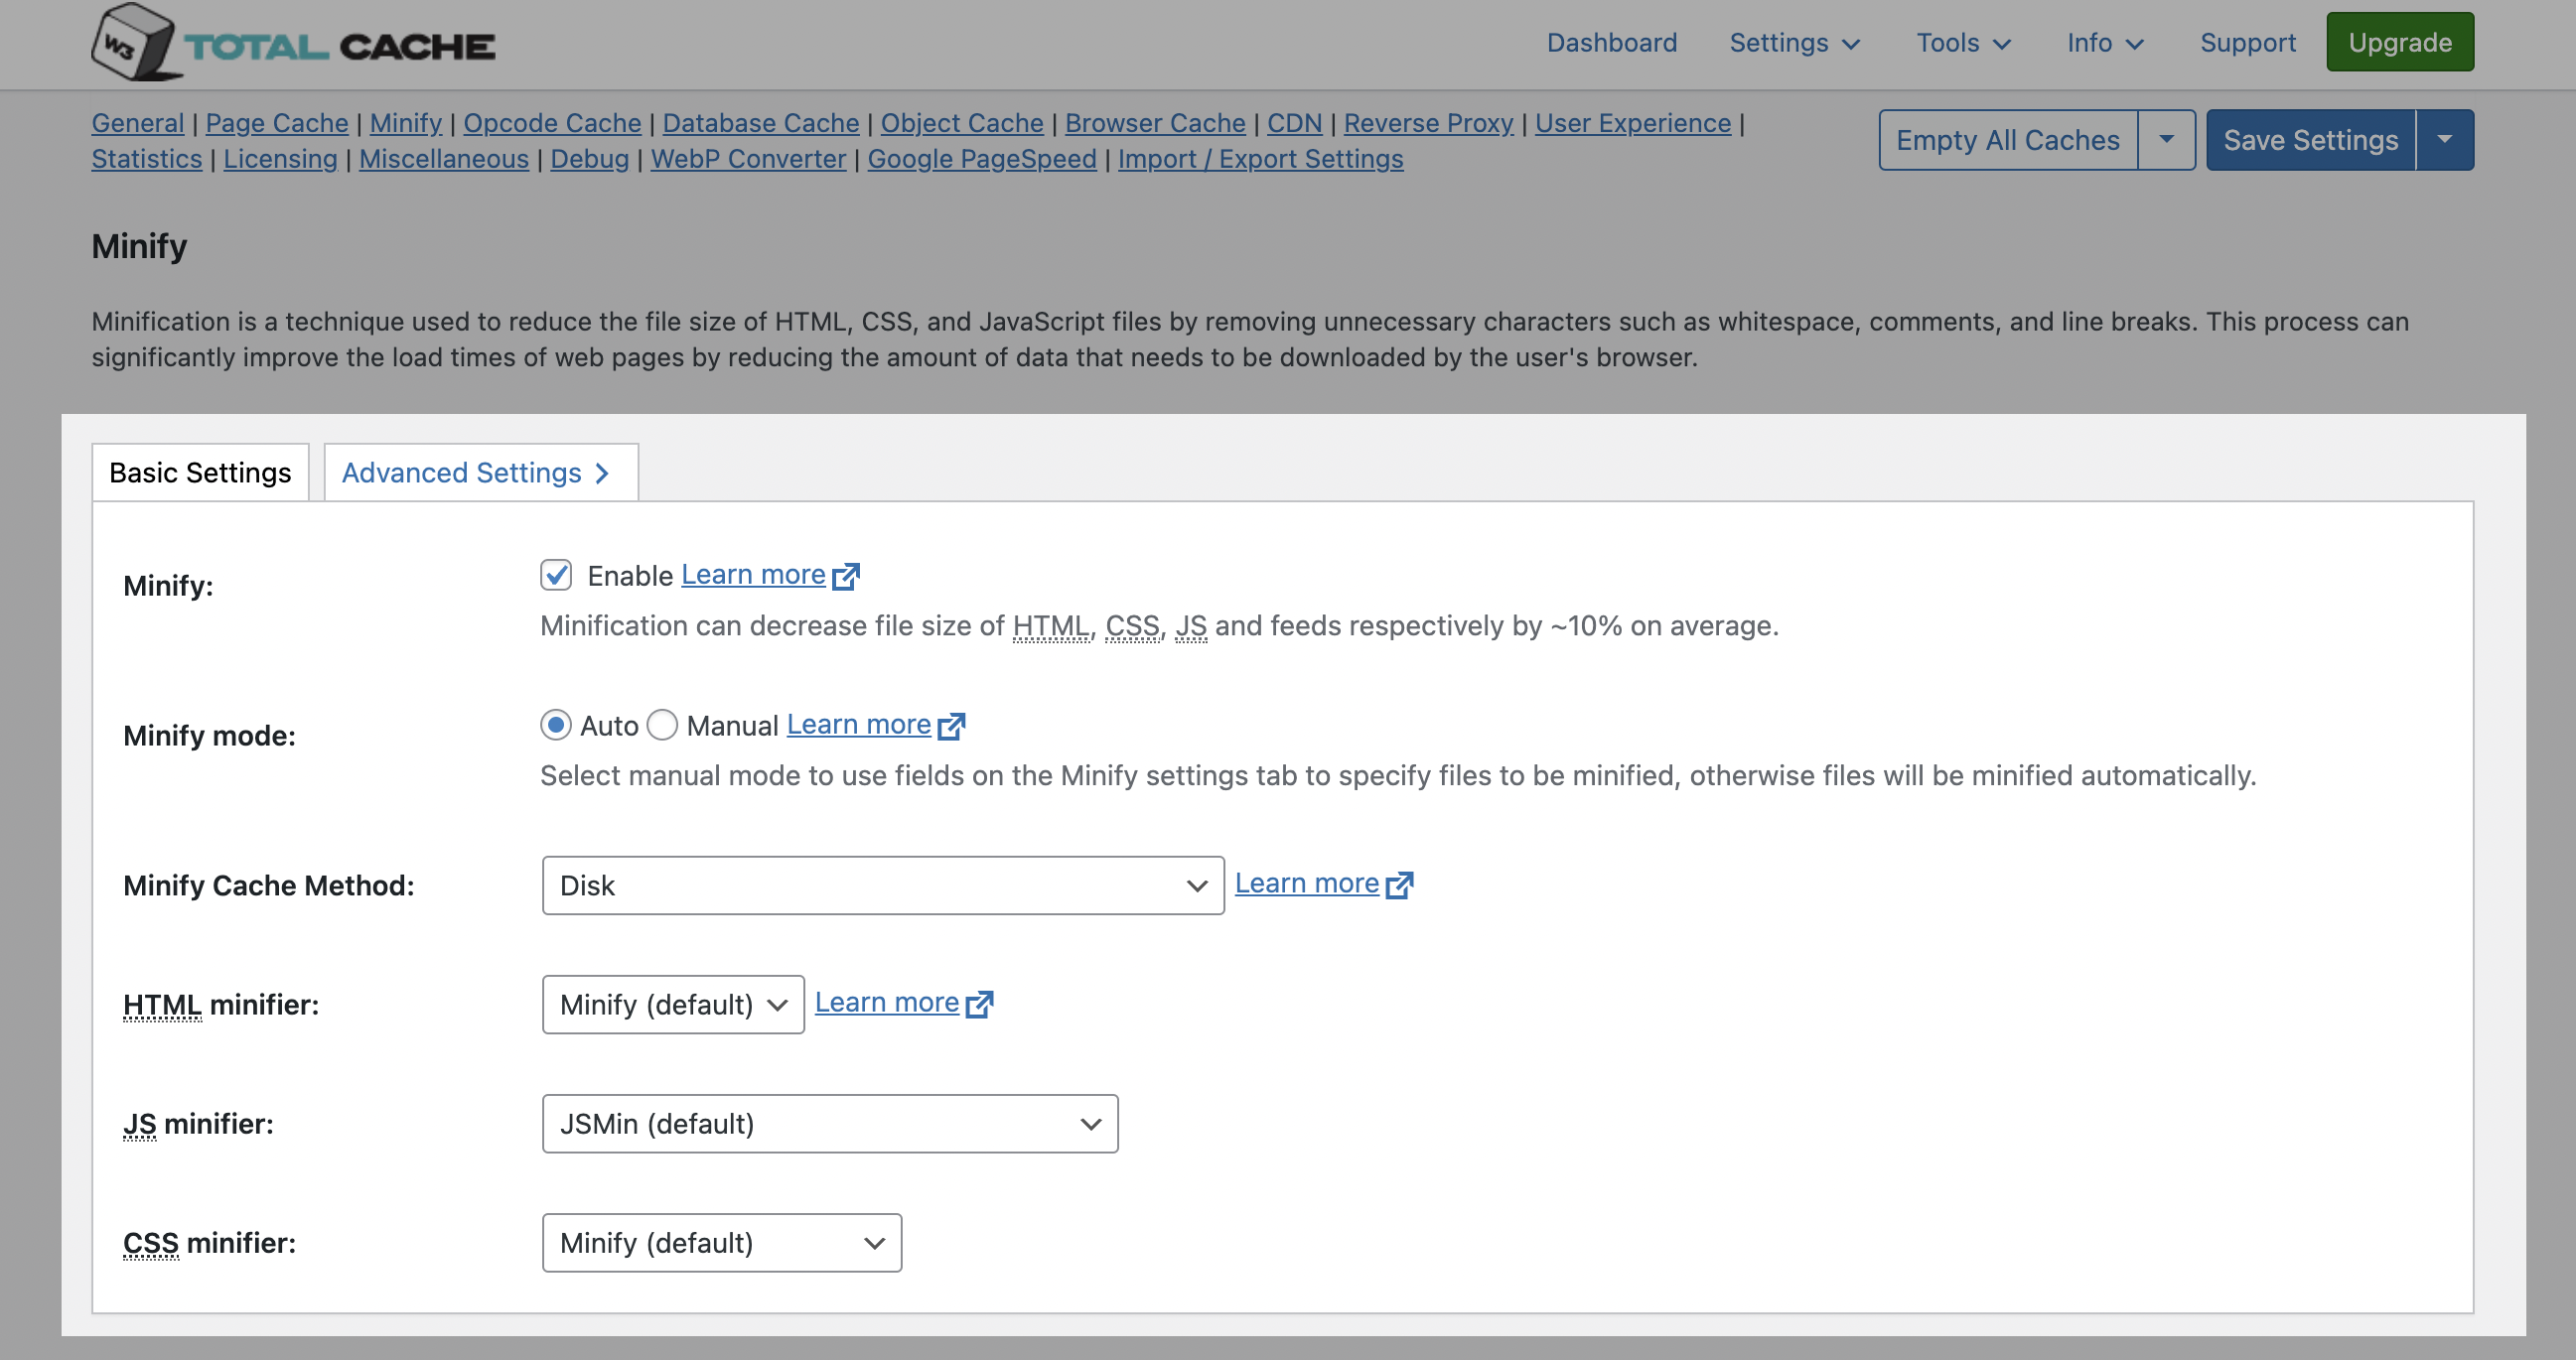
Minify Settings
Minifying reduces the size of your CSS, JavaScript, and HTML files. Be cautious with these settings, as they can sometimes break your site’s layout if configured incorrectly.
Opcode Cache
Opcode cache is a powerful feature that enhances the performance of a WordPress website by caching compiled PHP code. By storing pre-compiled code in memory, opcode cache eliminates the need for repetitive interpretation and compilation of PHP files, resulting in significantly faster execution times. Opcode cache reduces server load and improves response times, ultimately enhancing the overall speed and responsiveness of your WordPress site. If opcode cache is available on the hosting server it will automatically be selected in the dropdown and enabled.
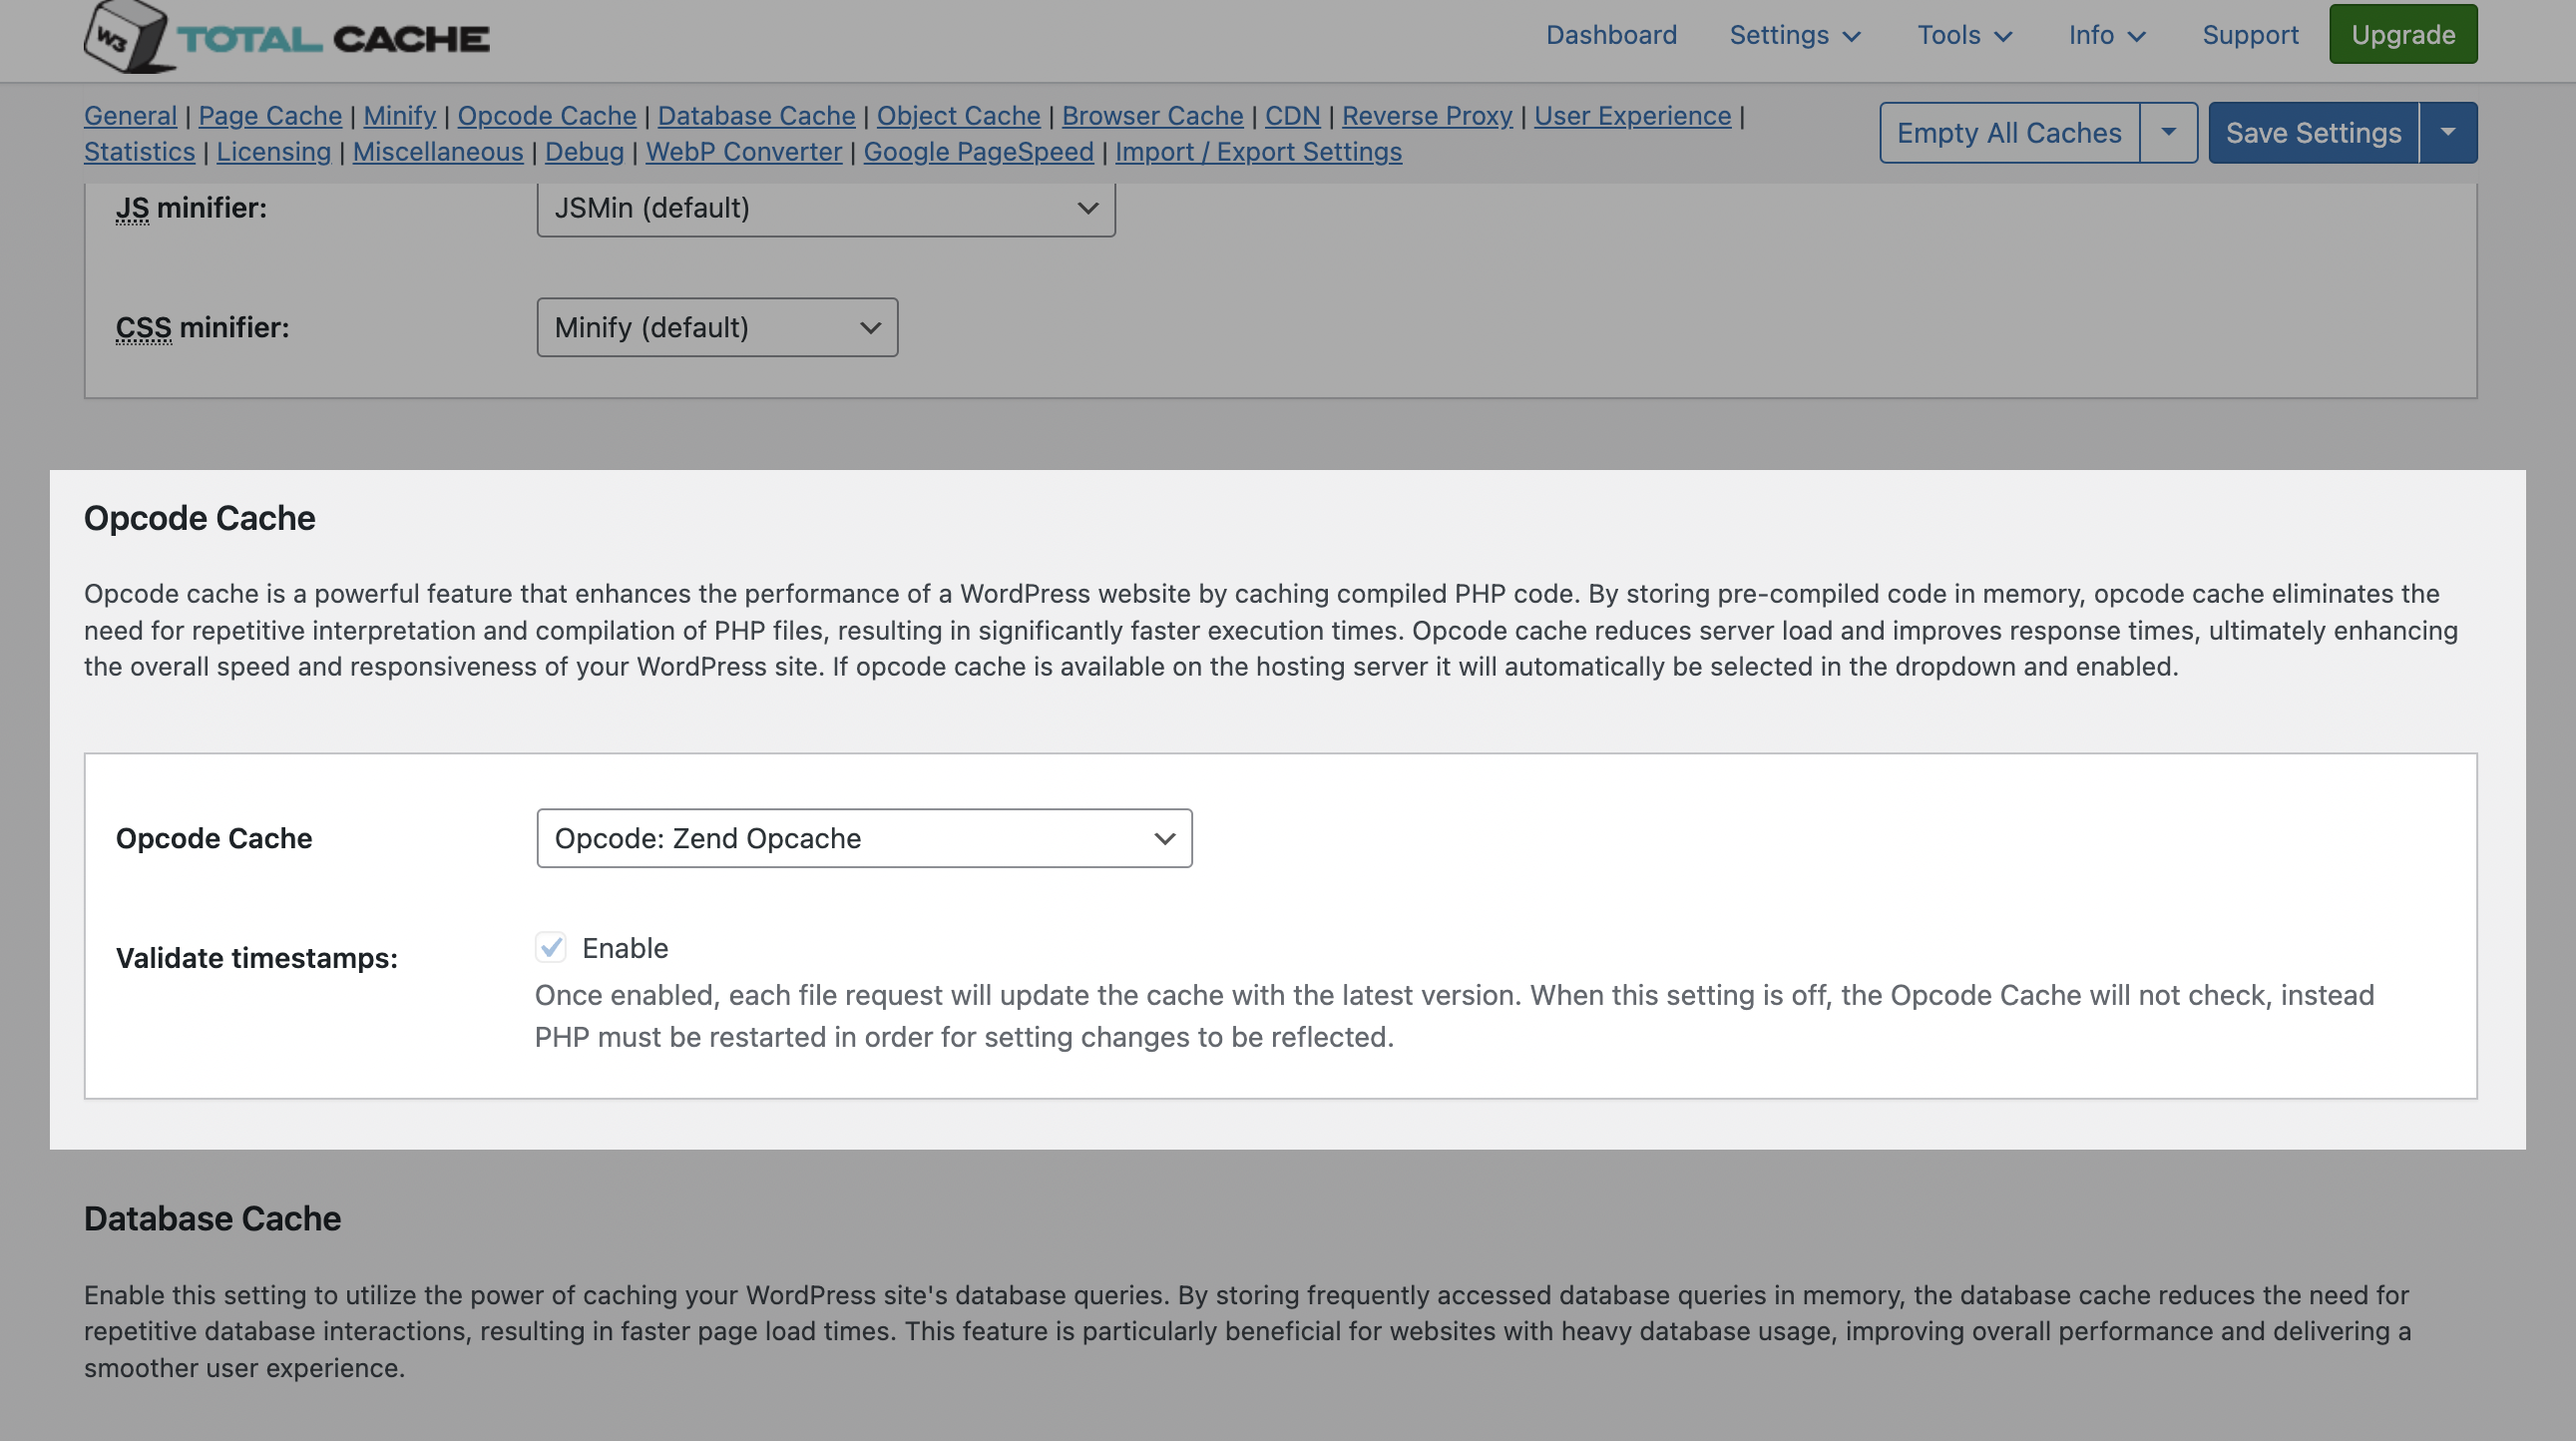
Once enabled, each file request will update the cache with the latest version. When this setting is off, the Opcode Cache will not check, instead PHP must be restarted in order for setting changes to be reflected.
Database Cache Settings
Enabling database caching can reduce post, page, and feed creation time. However, on high-traffic sites or sites on shared hosting, it’s sometimes best to leave this disabled to avoid overloading the database server.
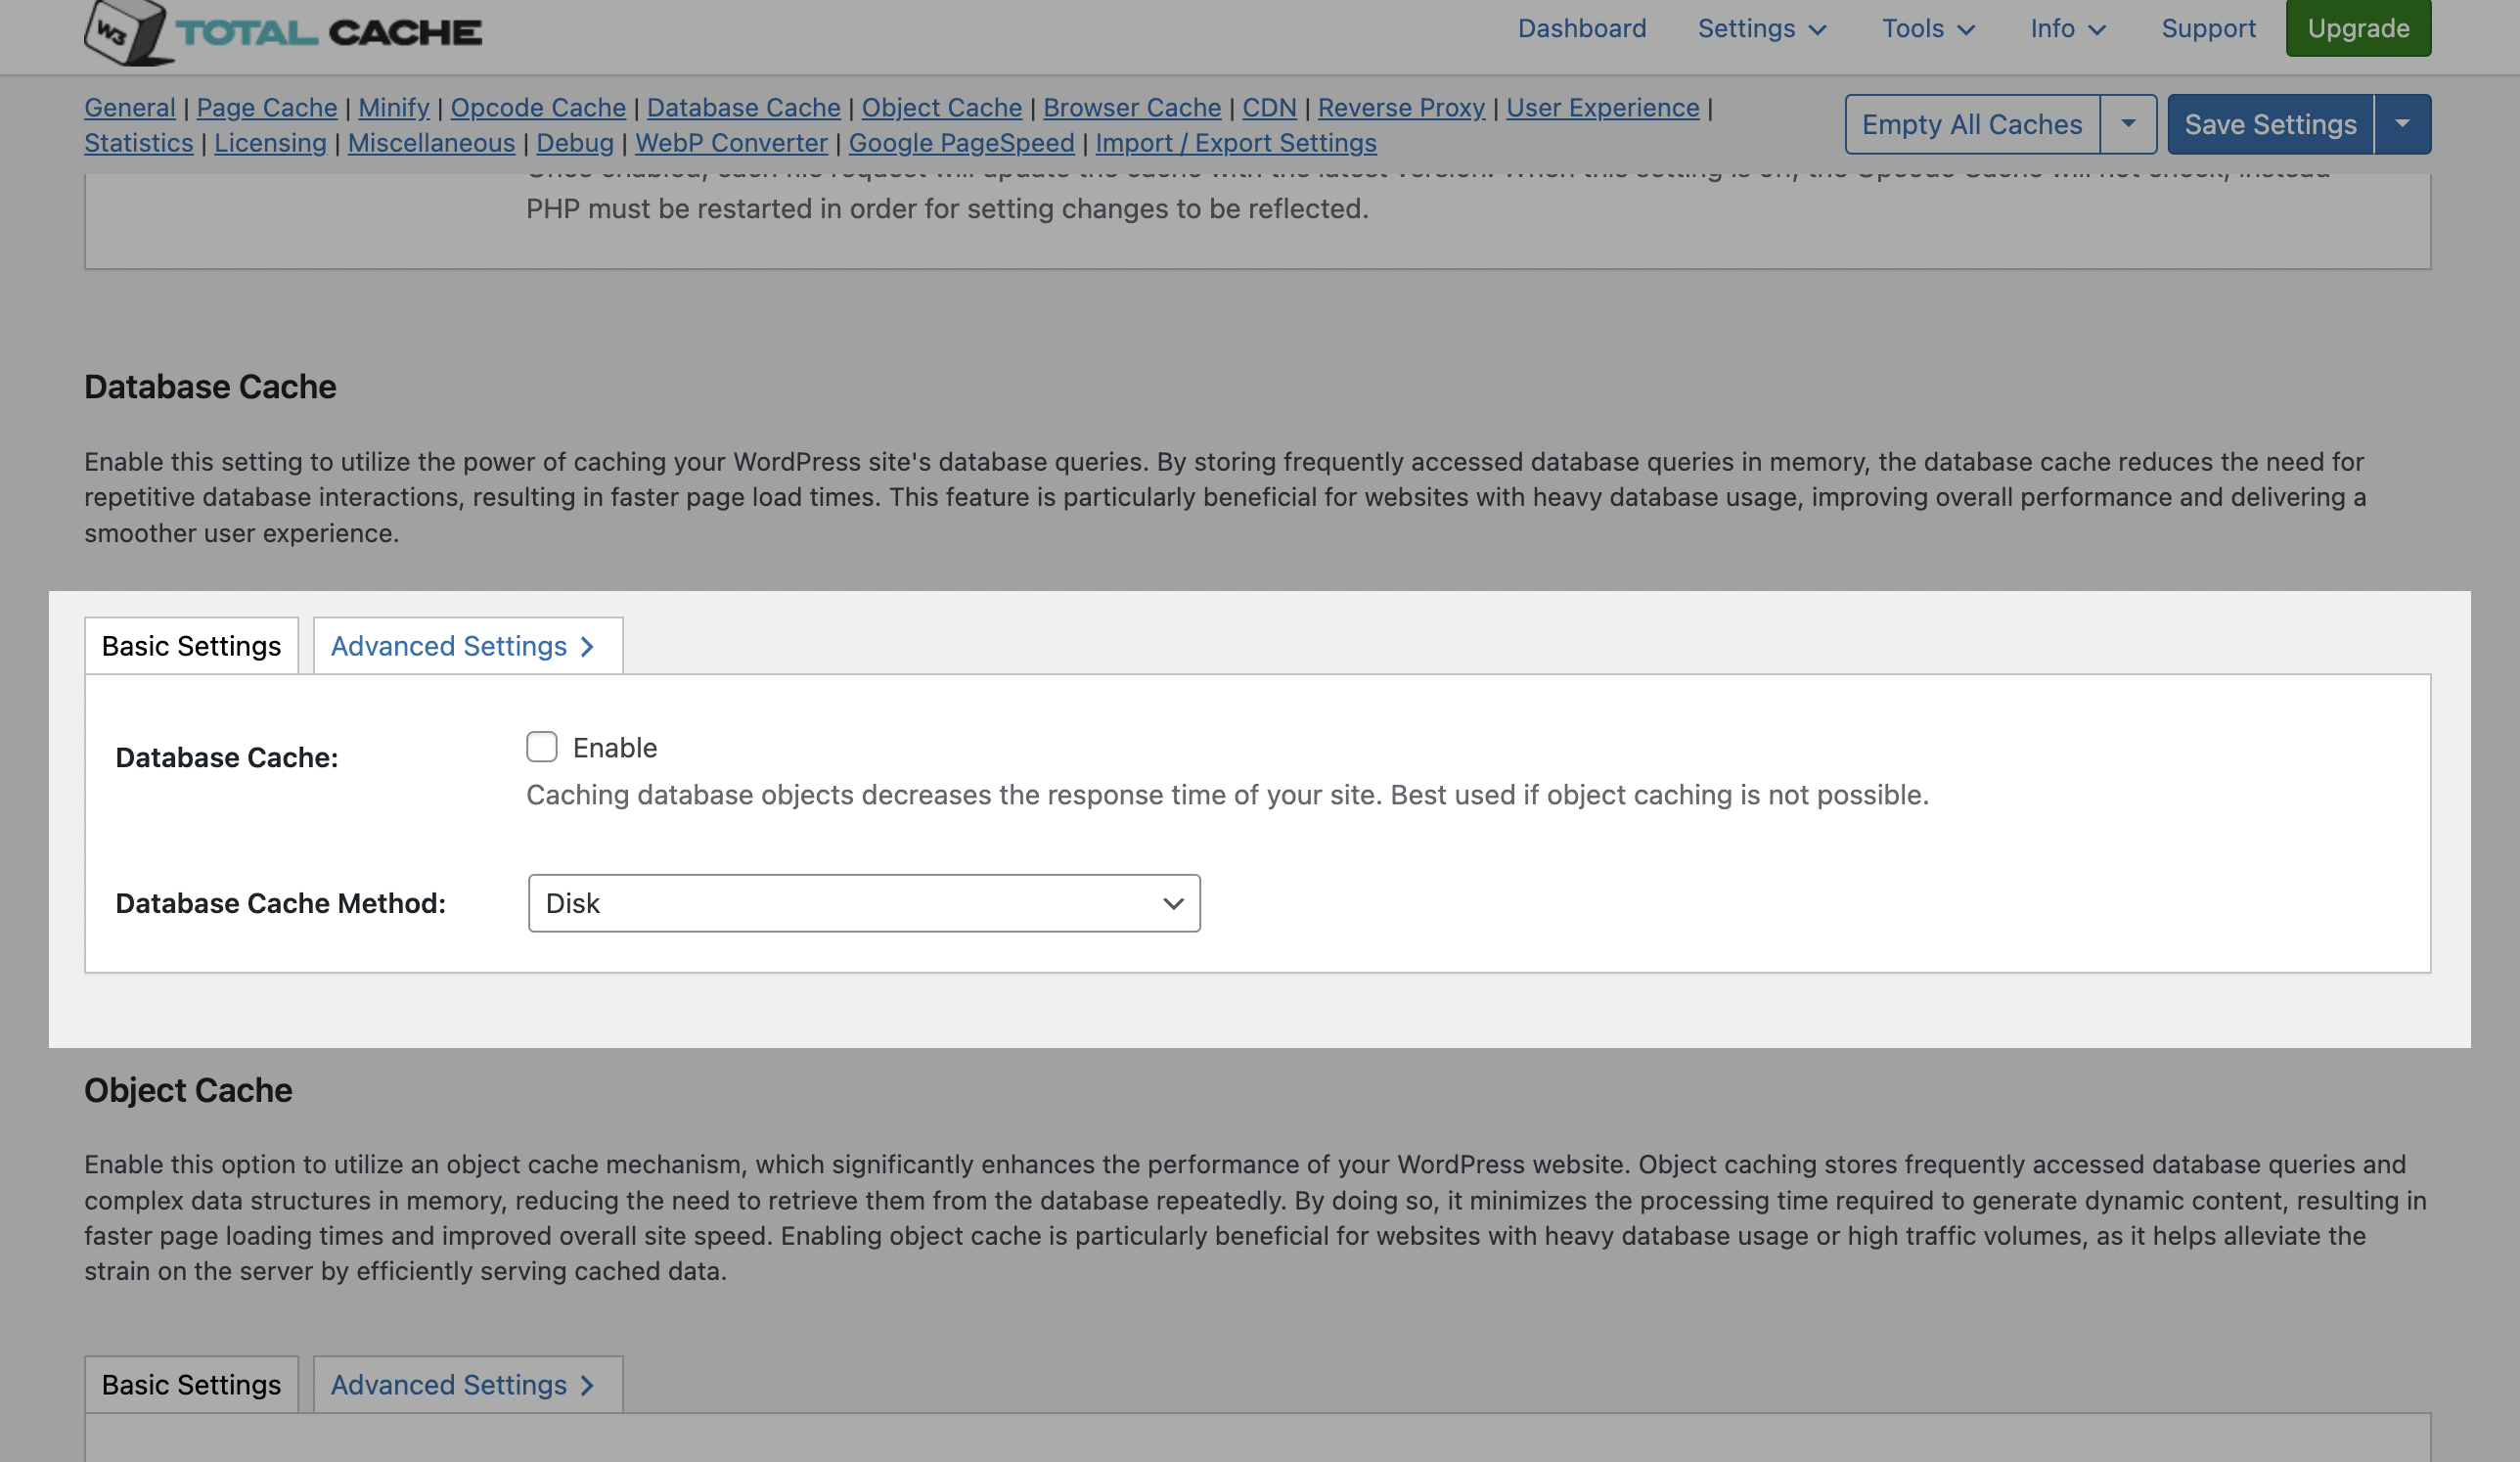
We recommend keeping it disabled. For most small to medium-sized websites your MySQL server will be able to fetch data more quickly than the Database cache.
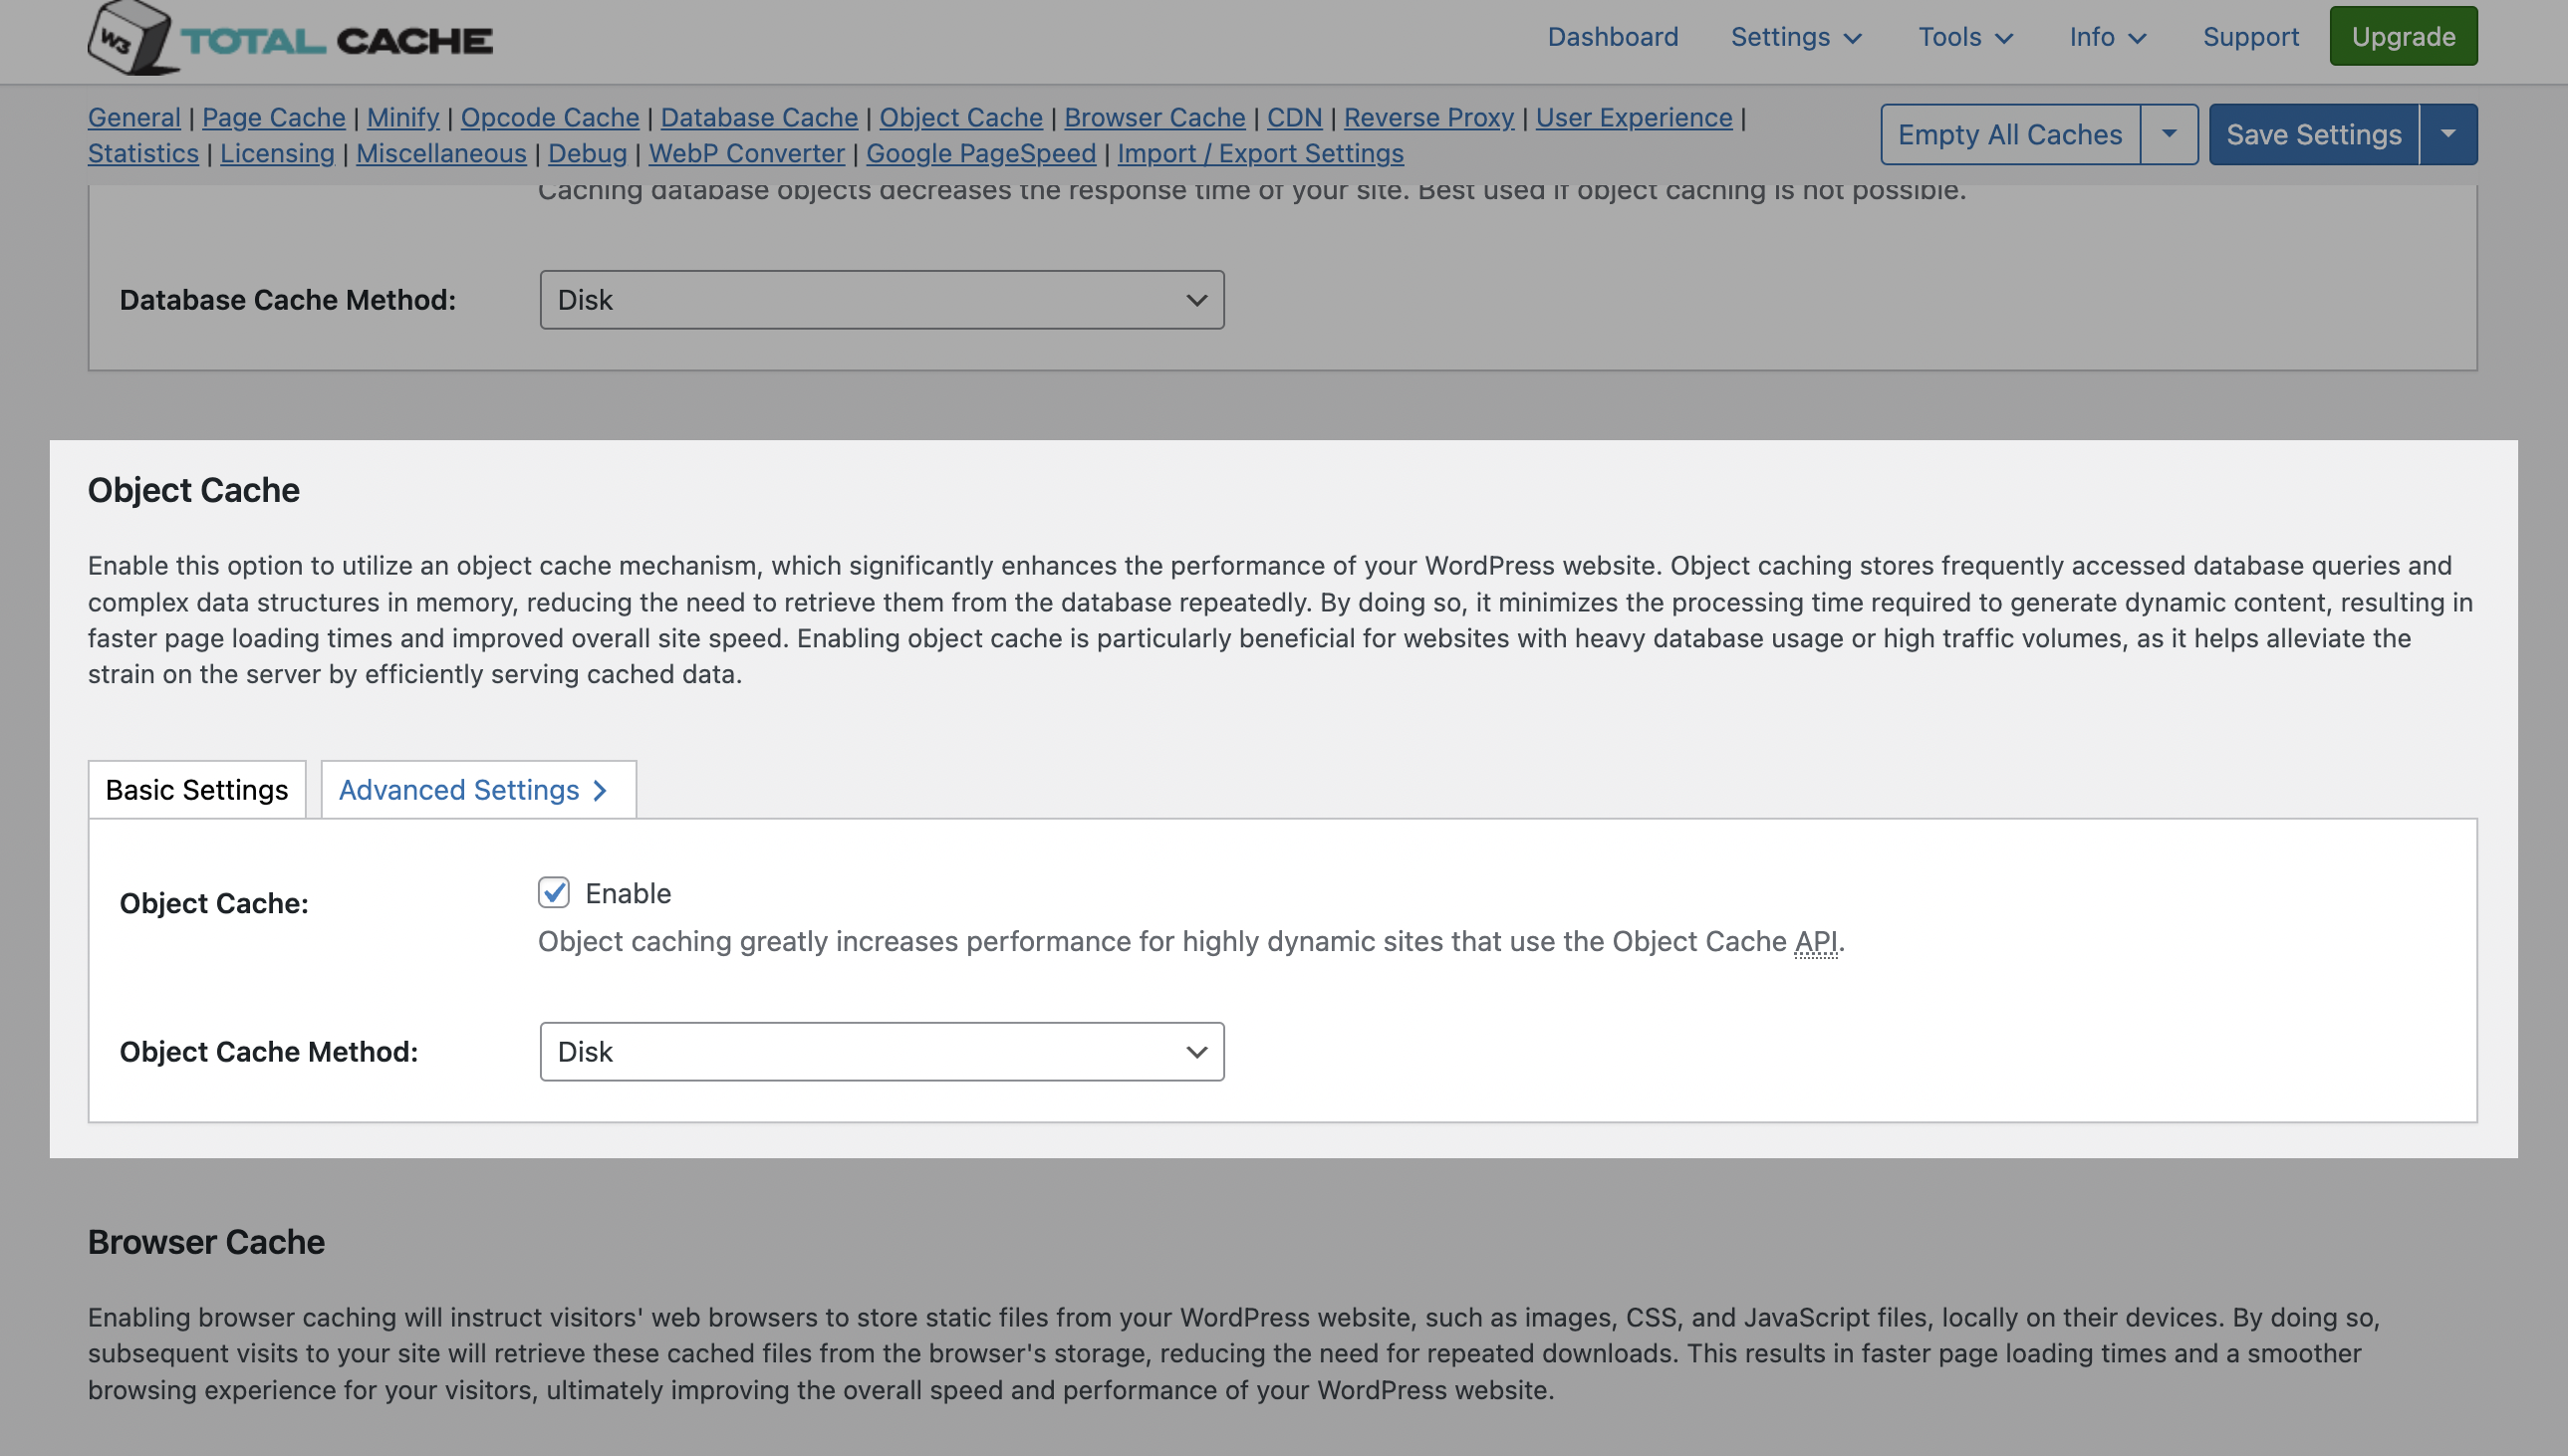
Object Cache Settings
Enable this option to utilize an object cache mechanism, which significantly enhances the performance of your WordPress website. Object caching stores frequently accessed database queries and complex data structures in memory, reducing the need to retrieve them from the database repeatedly. By doing so, it minimizes the processing time required to generate dynamic content, resulting in faster page loading times and improved overall site speed. Enabling object cache is particularly beneficial for websites with heavy database usage or high traffic volumes, as it helps alleviate the strain on the server by efficiently serving cached data.
Browser Cache Settings
Browser caching allows static content (like images, CSS, JavaScript) to be stored in the visitor’s browser, reducing load times for repeat visitors.
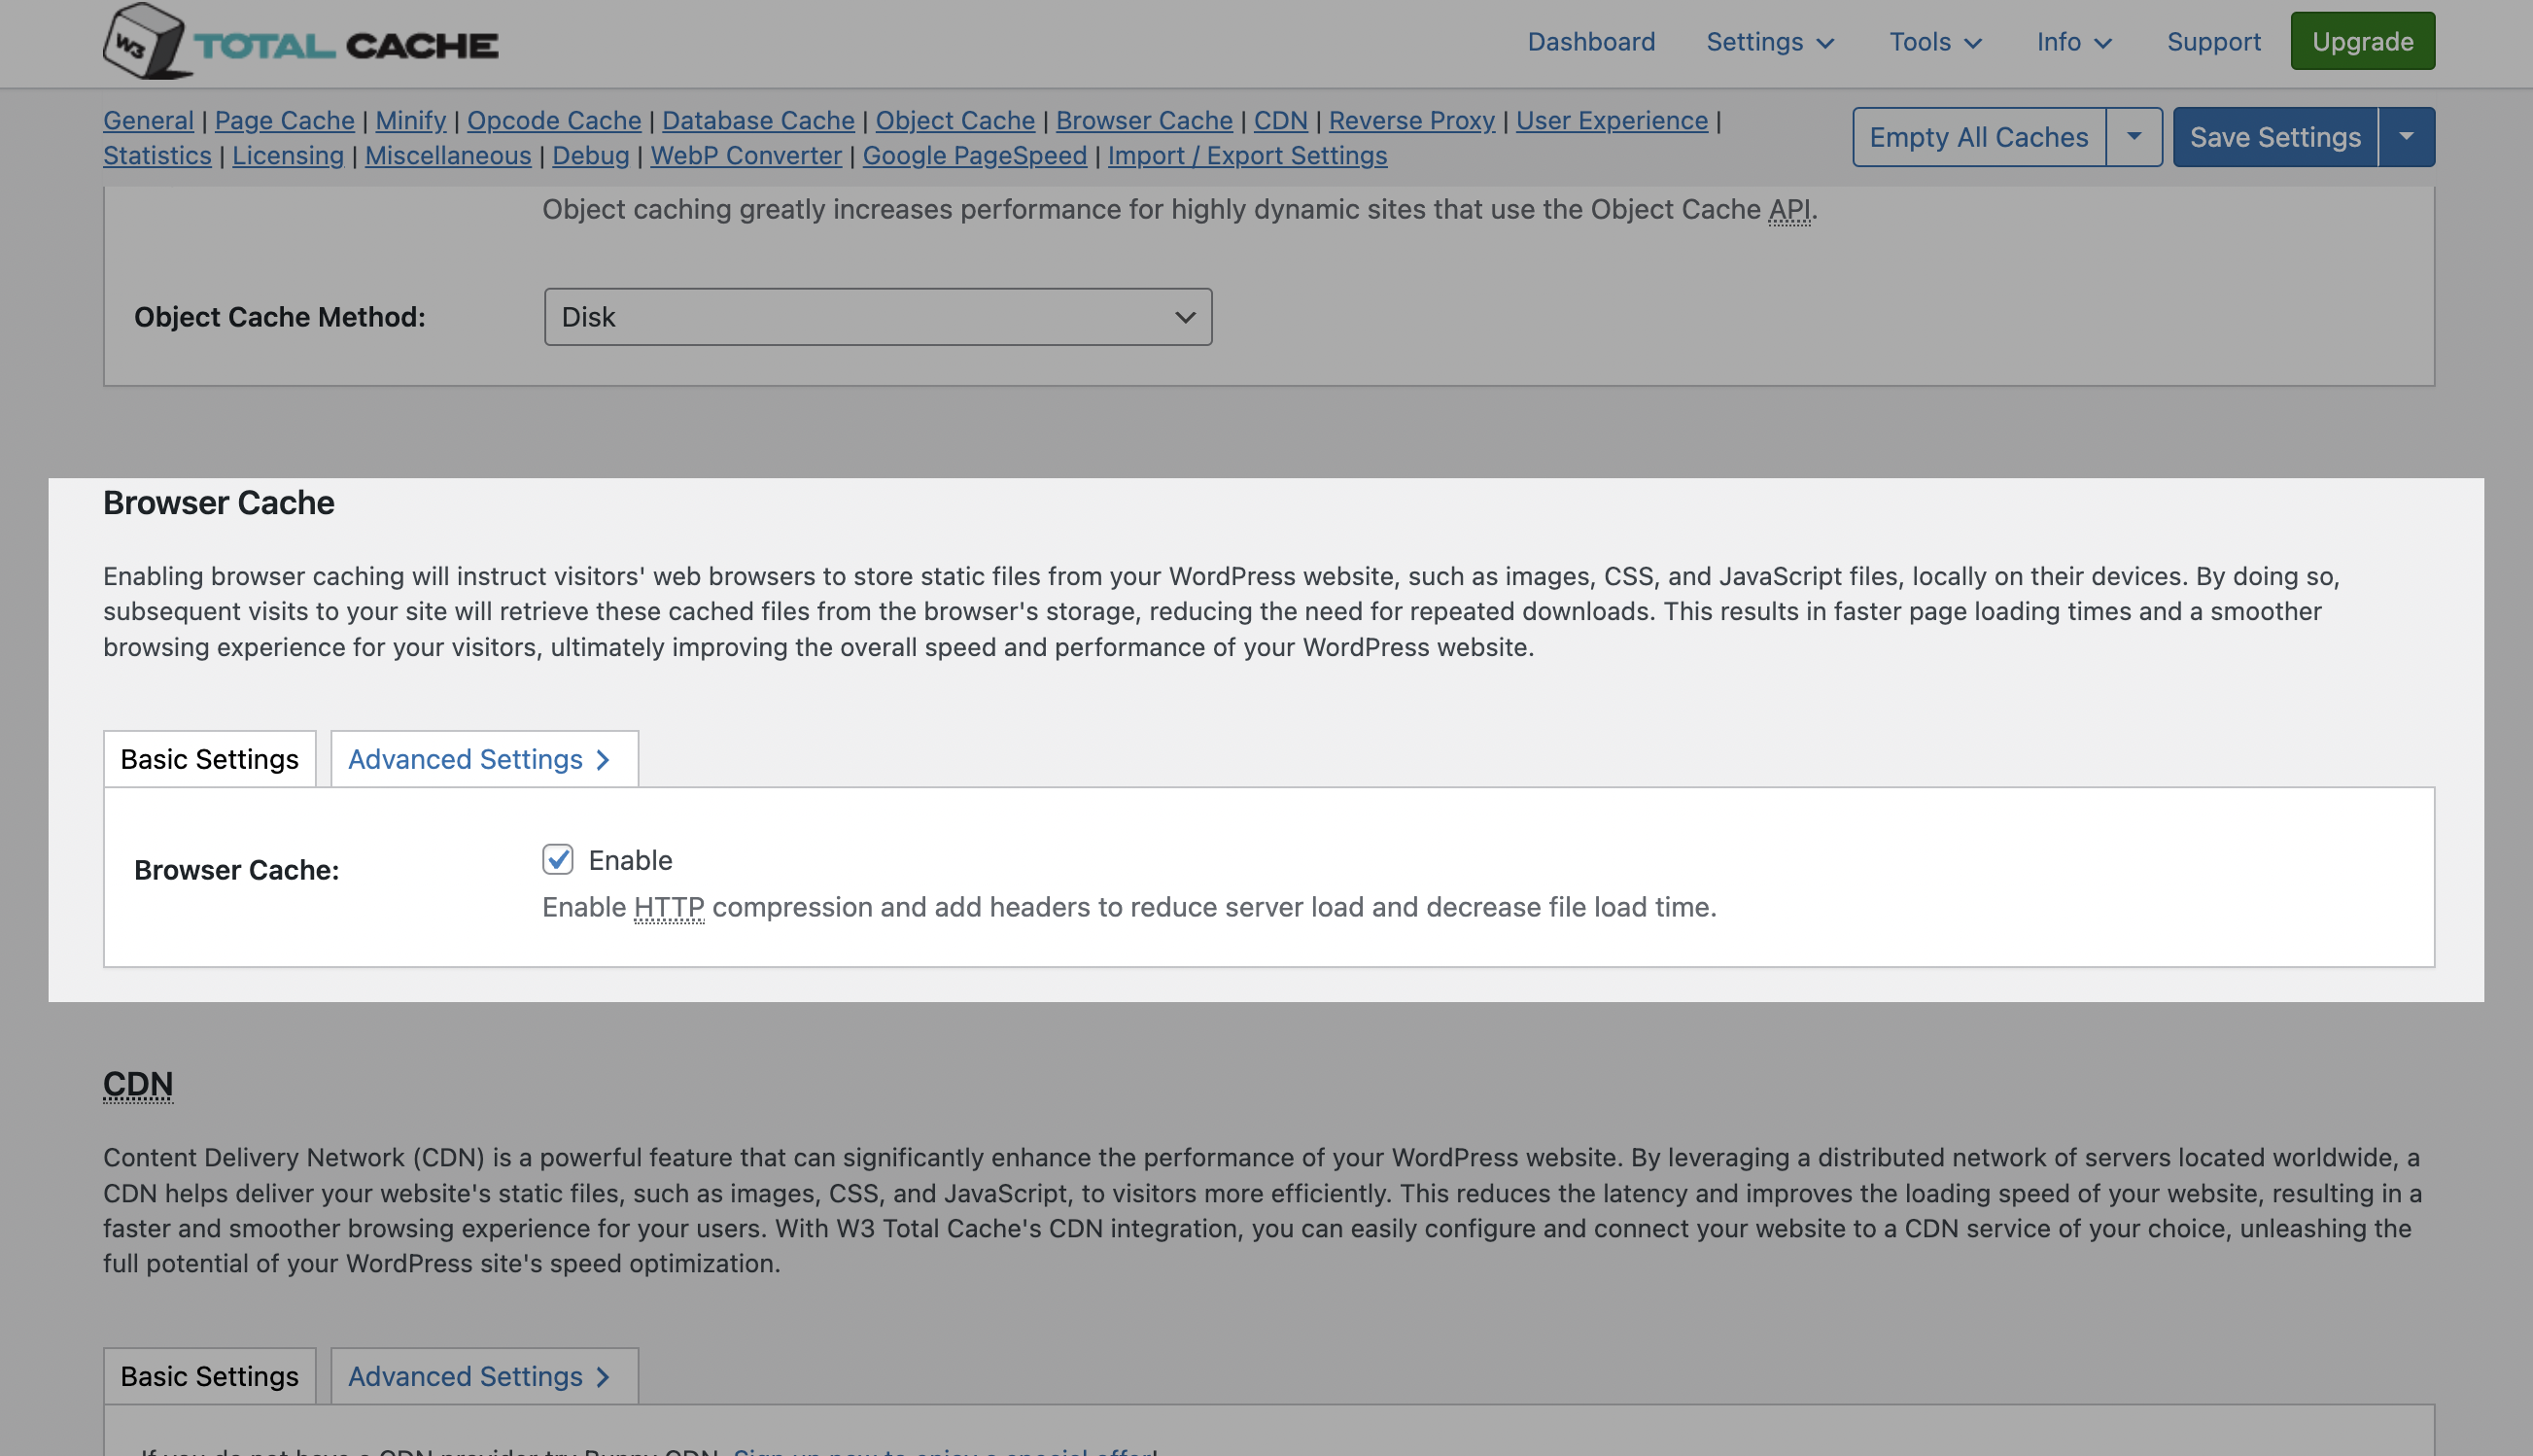
Enable HTTP compression and add headers to reduce server load and decrease file load time.
Advanced Configuration (Optional)
For those looking to squeeze out every last drop of performance, diving into the advanced settings can provide additional benefits.
CDN Integration
Content Delivery Network (CDN) is a powerful feature that can significantly enhance the performance of your WordPress website. By leveraging a distributed network of servers located worldwide, a CDN helps deliver your website’s static files, such as images, CSS, and JavaScript, to visitors more efficiently. This reduces the latency and improves the loading speed of your website, resulting in a faster and smoother browsing experience for your users. With W3 Total Cache’s CDN integration, you can easily configure and connect your website to a CDN service of your choice, unleashing the full potential of your WordPress site’s speed optimization.
Integrating a CDN can significantly reduce load times for visitors by distributing your content across multiple servers worldwide.
Reverse Proxy
A reverse proxy is a server that sits between a client and a web server, acting as an intermediary for requests. It retrieves resources on behalf of the client from the server, and then returns the response to the client. By utilizing a reverse proxy, such as Varnish or Nginx, in conjunction with W3 Total Cache, you can significantly enhance the performance of your WordPress website by caching and serving static content directly from the reverse proxy server, reducing the load on your WordPress server and improving response times for visitors.
User Experience
User Experience (UX) is a setting that focuses on enhancing the overall browsing experience for visitors of your website. By enabling this feature, you can optimize your website’s performance by minimizing load times, reducing server requests, and delivering content more efficiently. This ultimately leads to faster page loading, improved user satisfaction, and increased engagement, resulting in a speedier and more enjoyable WordPress website.

WebP Converter
The WebP Converter tool can be used to generate WebP versions of media library images which offer superior lossless and lossy compression.

Google PageSpeed
The PageSpeed Tool is a powerful feature that can be used to help optimize and enhance the performance of your WordPress website. By leveraging the insights and recommendations provided by Google’s PageSpeed Insights API, this tool analyzes your website’s speed and suggests improvements to boost its performance. By implementing the recommended optimizations, such as minimizing CSS and JavaScript, optimizing images, and enabling browser caching, you can significantly accelerate your WordPress site, resulting in faster loading times and an improved user experience.

Import / Export Settings
This tool allows users to easily transfer their W3 Total Cache plugin settings between different WordPress installations by exporting the current configuration as a file and importing it on another site, ensuring consistent caching and performance optimizations across multiple websites.

Advanced Minify Settings
Careful adjustment of the minify settings can reduce file sizes further without breaking your site’s design.
Database Cache Fine-Tuning
Adjusting the database cache settings can help optimize query performance, especially for sites with high traffic.
Object Cache Advanced Options
Fine-tuning object cache settings can help with performance on sites with complex data structures or heavy use of custom queries.
Browser Cache Tweaks
Further tweaks to the browser cache settings can ensure optimal caching strategies for all types of content on your site.
Testing and Performance Measurement
After configuring W3 Total Cache, it’s important to measure the performance improvements.
Tools to Measure Website Speed
Use tools like Google PageSpeed Insights, GTmetrix, or Pingdom to analyze your site’s performance before and after optimization.
Before and After Comparison
Documenting your site’s performance before and after configuring W3 Total Cache can provide clear evidence of the improvements made.
Troubleshooting Common Issues
Even with careful configuration, you may encounter issues. Here are some tips for resolving common problems.
Dealing with Plugin Conflicts
If you notice any issues after activating W3 Total Cache, try deactivating other plugins one by one to identify any conflicts.
Resolving Minify Errors
If your site’s layout breaks after enabling minify, try adjusting the minify settings or excluding specific files from being minified.
Fixing CDN-Related Problems
Ensure your CDN settings are correctly configured. Incorrect settings can lead to missing images or slow loading times. If necessary, consult your CDN provider’s documentation for specific configuration advice.
Best Practices for Using W3 Total Cache
To ensure your site continues to run smoothly with W3 Total Cache, follow these best practices:
Regularly Update the Plugin
Keep W3 Total Cache updated to benefit from performance improvements, new features, and security patches. WordPress will notify you when updates are available.
Monitor Website Performance
Regularly check your website’s performance using speed testing tools. This helps identify any slowdowns and areas for further optimization.
Optimize Images and Other Media
While W3 Total Cache can improve load times, optimizing images and media files is also crucial. Use image optimization plugins and consider lazy loading for images and videos.
Integrating W3 Total Cache with Other Plugins
W3 Total Cache generally works well with other plugins, but there are some considerations:
Compatibility with SEO Plugins
W3 Total Cache is compatible with popular SEO plugins. Ensure both your SEO and caching plugins are configured to complement each other for the best results.
Using with Security Plugins
Security plugins and caching plugins can sometimes conflict, especially with features like minification and content delivery networks. Test your site after setting up both types of plugins to ensure everything works as intended.
W3 Total Cache Premium Features
While the free version of W3 Total Cache offers comprehensive tools for improving your site’s performance, upgrading to the premium version provides additional features:
Benefits of Upgrading
- Fragment Caching: Improves the performance of dynamic content.
- Full Site Delivery via CDN: Allows for entire pages to be served from CDN, reducing server load.
- Extended Support: Access to premium support can help resolve any issues more quickly.
Additional Features Overview
The premium version also includes extensions for additional performance improvements and compatibility with various web technologies and services.
Maintaining Your Optimized Website
To keep your WordPress site running at optimal speed, regular maintenance is necessary:
Regular Maintenance Tips
- Clear out old post revisions, spam comments, and transient options.
- Update WordPress, themes, and plugins to their latest versions.
- Re-evaluate your W3 Total Cache settings periodically, especially after adding new features or content to your site.
Keeping Your Site Optimized Over Time
Website optimization is an ongoing process. As web technologies evolve and your site grows, continually review and adjust your caching strategies to ensure the best performance.
Conclusion
W3 Total Cache is a powerful tool for improving your WordPress site’s speed and performance. By following this guide to install and configure W3 Total Cache, along with regular maintenance and optimization practices, you can ensure a fast, efficient, and user-friendly website. Remember, a faster site not only enhances the user experience but can also improve your search engine rankings, making it a critical aspect of your website’s success.
FAQs
What is the difference between W3 Total Cache and other caching plugins?
W3 Total Cache offers a comprehensive set of features for page, object, database, and browser caching, as well as minification and CDN integration, making it one of the most versatile caching plugins available.
How often should I clear my cache?
You should clear your cache whenever you update content on your site or make changes to your site’s design or functionality. W3 Total Cache also provides options to automatically clear the cache at specified intervals or events.
What is W3 Total Cache?
W3 Total Cache is a popular WordPress plugin designed to improve website performance by caching content, reducing server load, and optimizing various aspects of website delivery.
How do I install W3 Total Cache?
To install W3 Total Cache, log in to your WordPress dashboard, navigate to the “Plugins” section, click “Add New,” search for “W3 Total Cache,” and click “Install Now.” Once installed, activate the plugin.
What caching methods does W3 Total Cache support?
W3 Total Cache supports various caching methods, including page caching, browser caching, object caching, and database caching. These methods help speed up website loading times by storing frequently accessed data for quicker retrieval.
How can I configure W3 Total Cache for optimal performance?
Configuring W3 Total Cache depends on your website’s specific needs and server environment. However, general best practices include enabling page caching, minification of CSS and JavaScript files, enabling browser caching, and utilizing a content delivery network (CDN) if available.
While W3 Total Cache can improve website performance on shared hosting, its effectiveness may be limited compared to dedicated or cloud hosting environments. However, properly configuring the plugin can still provide noticeable performance improvements.
Why is my website experiencing issues after activating W3 Total Cache?
Common issues after activating W3 Total Cache include caching conflicts with other plugins, compatibility issues with certain themes, or misconfigurations. Troubleshooting involves deactivating other plugins temporarily, switching to a default theme, and adjusting W3 Total Cache settings.
How can I clear the cache in W3 Total Cache?
You can clear the cache in W3 Total Cache by navigating to the plugin’s settings page in your WordPress dashboard, selecting the “Performance” tab, and clicking on the “Empty All Caches” button. Additionally, you can clear specific caches such as page cache, minify cache, and object cache individually.
Is W3 Total Cache compatible with WooCommerce?
Yes, W3 Total Cache is compatible with WooCommerce, the popular eCommerce plugin for WordPress. However, you may need to configure the plugin settings to avoid conflicts and ensure smooth operation, especially with dynamic content like shopping carts and checkout pages.
Does W3 Total Cache have any known compatibility issues with certain plugins or themes?
While W3 Total Cache is generally compatible with most plugins and themes, occasional conflicts may arise due to differences in coding practices. It’s essential to test the plugin thoroughly after installation and monitor for any compatibility issues, especially when updating plugins or themes.
How can I monitor the performance improvements gained from using W3 Total Cache?
You can monitor performance improvements with W3 Total Cache by using tools like Google PageSpeed Insights, GTmetrix, or Pingdom Tools to measure website loading times, page speed scores, and overall performance metrics before and after implementing the plugin. Additionally, observing server resource usage and website responsiveness can provide valuable insights into the effectiveness of caching optimizations.
